Introduction
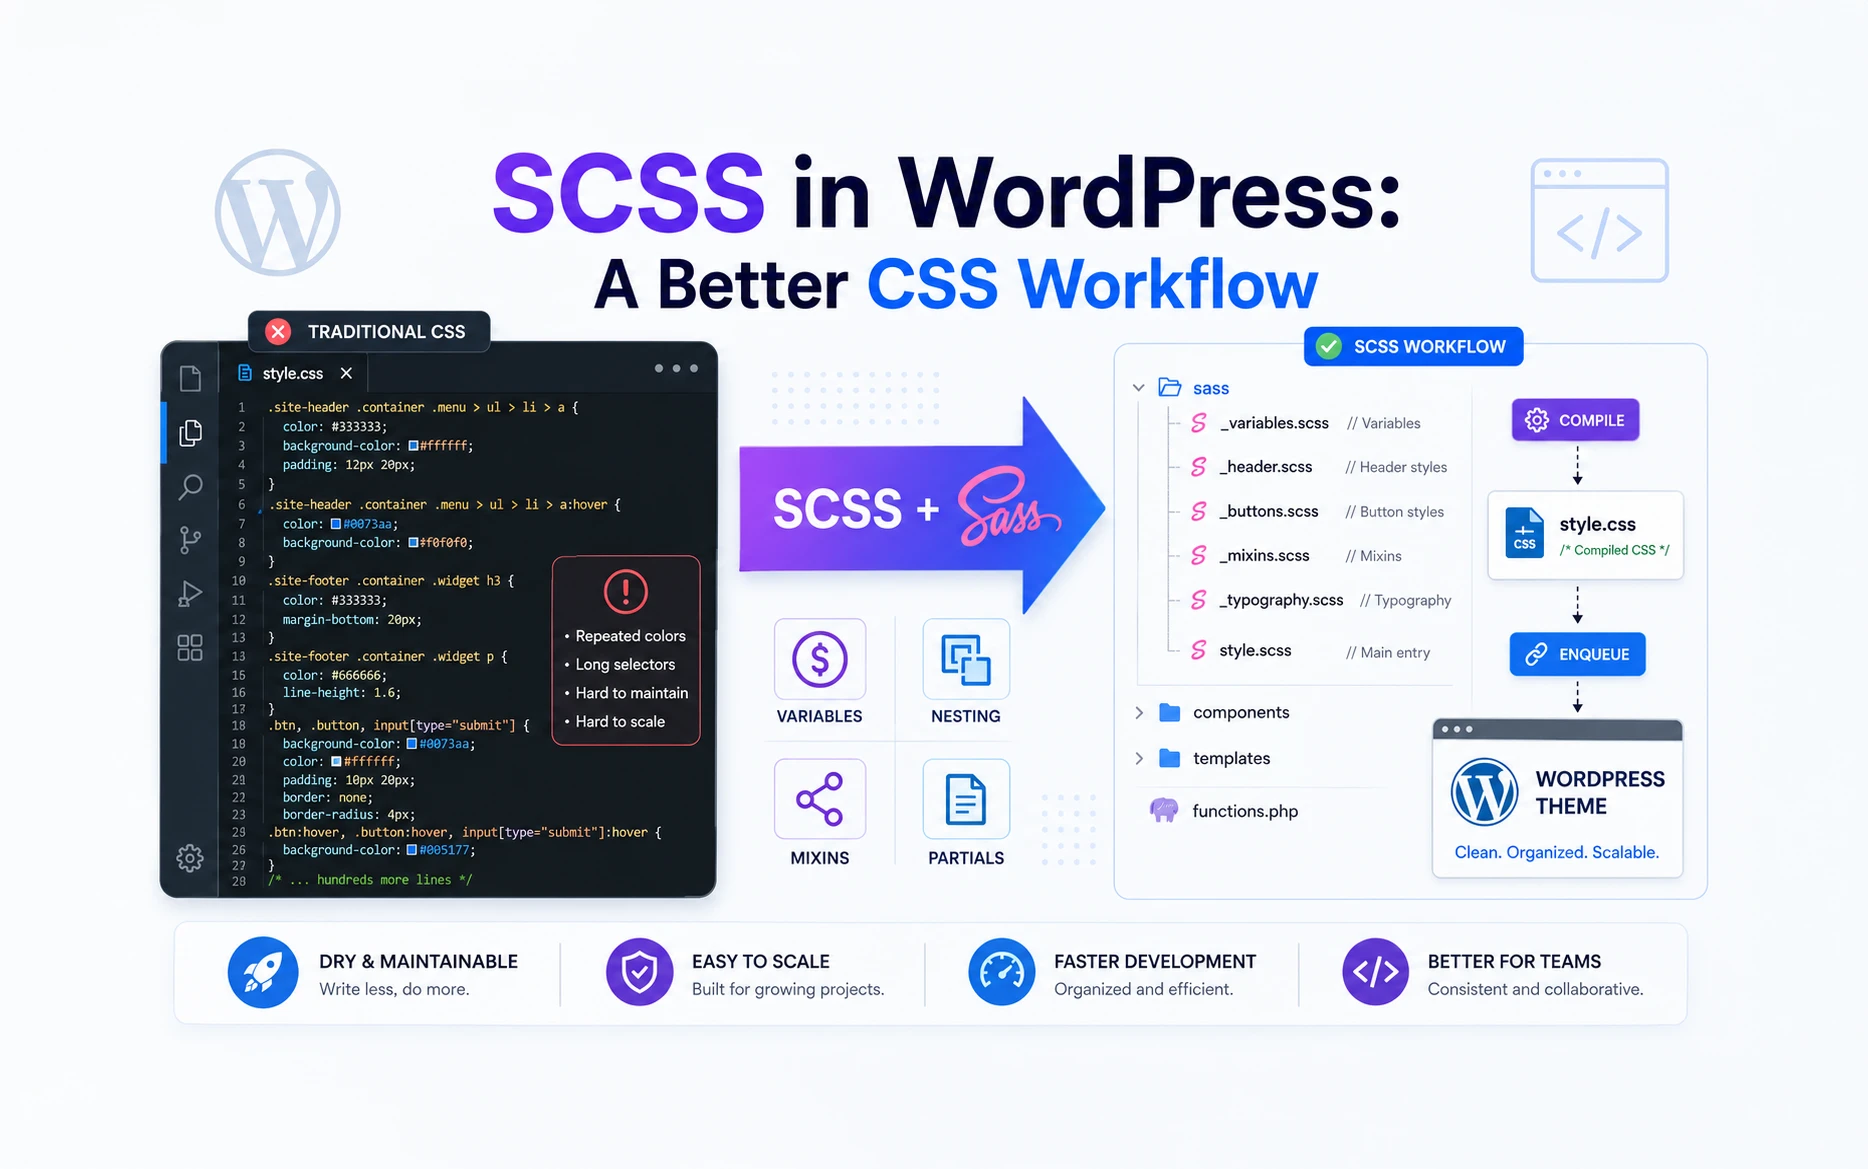
If you’ve been building websites for a while, you’ve probably experienced the moment when a CSS file starts getting out of hand.
A few styles become hundreds. Colors get repeated everywhere. Media queries pile up. Finding and updating a specific style becomes a task on its own.
CSS is fantastic, but as projects grow, maintaining large stylesheets can become challenging.
This is where SCSS comes in.
SCSS is a syntax built on top of CSS that adds powerful features like variables, nesting, mixins, and reusable modules. These features help developers write cleaner, more maintainable stylesheets while still generating standard CSS that browsers can understand.
In this article, we’ll explore what SCSS is, why developers still use it even though modern CSS has evolved significantly, experiment with some examples, and finally learn how to integrate SCSS into a WordPress project.
What Is SCSS?
SCSS stands for Sassy Cascading Style Sheet.
It looks very similar to regular CSS, but includes additional features that make development easier.
For example, this is perfectly valid SCSS:
$primary-color: #0066ff;

.button {
    background: $primary-color;
}
Browsers cannot read SCSS directly.
Instead, SCSS must first be converted into standard CSS before being sent to the browser.
The workflow looks like this:
SCSS → Sass Compiler → CSS → Browser
The browser only ever sees the final CSS file.
The good news is that if you already know CSS, learning SCSS is surprisingly easy because the syntax feels very familiar.
Why Use SCSS When CSS Already Has Variables?
Years ago, one of the biggest selling points of SCSS was variables.
Today, modern CSS already supports custom properties:
:root {
    --primary-color: #0066ff;
}

.button {
    background: var(--primary-color);
}
So it’s fair to ask:
If CSS already has variables, why should we use SCSS?
The answer is simple.
Variables are only one small feature.
SCSS provides an entire workflow that helps organize and maintain larger projects through:
- Nesting
- Mixins
- Partials
- Reusable code structures
- Better project organization
In other words, CSS variables solve a single problem, while SCSS helps solve the broader challenge of managing large stylesheets.
Let’s look at some practical examples.
Feature 1: Nesting
One of the first things developers appreciate about SCSS is nesting.
Consider this CSS:
.nav {}
.nav ul {}
.nav ul li {}
.nav ul li a {}
.nav ul li a:hover {}
As components become more complex, selectors become longer and harder to manage.
With SCSS, you can nest related styles together:
.nav {

    ul {

        li {

            a {

                text-decoration: none;

                &:hover {
                    text-decoration: underline;
                }

            }

        }

    }

}
The structure closely matches the HTML hierarchy, making the stylesheet easier to read and maintain.
Feature 2: Mixins
Imagine you have a card design that appears throughout your website.
Without SCSS, you might find yourself copying the same styles repeatedly.
With mixins, you can define the styles once:
@mixin card-style {
    border-radius: 8px;
    box-shadow: 0 5px 20px rgba(0,0,0,0.1);
}
Then reuse them anywhere:
.card {
    @include card-style;
}

.modal {
    @include card-style;
}

.product-box {
    @include card-style;
}
This keeps your code DRY (Don’t Repeat Yourself) and makes updates much easier.
Feature 3: Partials
As projects grow, placing everything inside a single stylesheet becomes difficult.
SCSS allows you to split your styles into multiple files called partials.
A common structure might look like this:
scss/
├── _variables.scss
├── _buttons.scss
├── _header.scss
├── _footer.scss
└── style.scss
Then import them into your main stylesheet:
@use 'variables';
@use 'buttons';
@use 'header';
@use 'footer';
This keeps projects organized and makes it easier to find and maintain code.
Try SCSS Yourself
The easiest way to understand SCSS is by experimenting with it.
You don’t need to install anything.
Open:
Once it loads:
- Open the scss folder.
- Open styles.scss.
- Make changes to the code.
- Watch the compiled CSS update automatically on the right side.
Try this example:
$primary-color: #0066ff;

.card {

    background: $primary-color;
    padding: 20px;

    h2 {
        color: white;
    }

    &:hover {
        transform: translateY(-5px);
    }

}
The playground instantly converts SCSS into CSS, allowing you to see exactly what happens behind the scenes.
Could I Use a WordPress Plugin Instead?
Before we install anything, let’s answer a common question.
If SCSS is so useful, why not simply use a WordPress plugin?
The answer is: you absolutely can.
Some popular options include:
These plugins can compile SCSS directly within WordPress, making them convenient for beginners and smaller websites.
So why are we using Node.js in this article instead?
Because most professional development workflows compile SCSS outside WordPress.
This approach provides:
- Better performance
- More control over the build process
- Easier collaboration with other developers
- Integration with Git and deployment workflows
- A setup that scales better as projects grow
For small websites, plugins are perfectly fine.
For custom themes and client projects, learning the standard development workflow is usually worth the effort.
Understanding Sass and SCSS
If you’ve followed along so far, you may have noticed something interesting.
Throughout this article we’ve been creating files such as:
style.scss
_variables.scss
_buttons.scss
Yet later we’ll install a package called Sass.
At first glance, that seems a little confusing.
If we’re writing SCSS, why aren’t we installing something called SCSS?
The answer is that Sass and SCSS are closely related, but they’re not the same thing.
Think of SCSS as the language you write and Sass as the software that processes it.
SCSS Files
      ↓
Sass Compiler
      ↓
CSS Files
The Sass compiler reads your SCSS files, processes features such as variables, nesting, and mixins, and generates standard CSS.
For example, this SCSS:
$primary-color: #0066ff;

.button {
    background: $primary-color;
}
is processed by Sass and converted into:
.button {
    background: #0066ff;
}
Historically, Sass originally had its own indentation-based syntax. Later, the SCSS syntax was introduced, using curly braces and semicolons that look almost identical to CSS.
Today, most developers write SCSS because it feels familiar and easy to learn, while using the Sass compiler to convert it into CSS.
That’s why you’ll create .scss files throughout this tutorial but install a package named sass.
Setting Up SCSS for a WordPress Theme
We’ll use the Sass CLI for this tutorial.
Don’t worry if you’ve never used Node.js before.
In this article we’re only using it for one purpose: converting SCSS into regular CSS.
Step 1: Install Node.js
Download and install Node.js from:
After installation, verify everything is working:
node -v
npm -v
If both commands return version numbers, you’re ready to continue.
Step 2: Install Sass
Open a terminal inside your WordPress theme folder and run:
npm install sass --save-dev
This installs the Sass compiler locally within your project.
Step 3: Create a Project Structure
A common structure looks like this:
my-theme/

├── assets/
│   ├── scss/
│   │   ├── style.scss
│   │   ├── _variables.scss
│   │   ├── _header.scss
│   │   └── _buttons.scss
│   │
│   └── css/
│       └── style.css
│
├── functions.php
└── style.css
The scss folder contains your source files.
The css folder contains the compiled output.
Step 4: Compile SCSS
Run:
npx sass assets/scss/style.scss assets/css/style.css
Sass will generate the CSS file that WordPress will ultimately load.
Step 5: Watch for Changes
Instead of compiling every time you make a change, you can let Sass watch your files:
npx sass --watch assets/scss:assets/css
Now every change you make inside the SCSS folder automatically generates updated CSS.
Enqueue the Compiled CSS in WordPress
Inside your functions.php file:
function my_enqueue_styles() {

    wp_enqueue_style(
        'theme-style',
        get_template_directory_uri() . '/assets/css/style.css',
        [],
        filemtime(
            get_template_directory() . '/assets/css/style.css'
        )
    );

}

add_action('wp_enqueue_scripts', 'my_enqueue_styles');
If you’ve never seen filemtime() before, let’s understand what it’s doing.
Understanding the Version Parameter
The fourth parameter of wp_enqueue_style() is the stylesheet version.
For example:
wp_enqueue_style(
    'theme-style',
    get_template_directory_uri() . '/assets/css/style.css',
    [],
    '1.0'
);
WordPress generates a URL similar to:
style.css?ver=1.0
This version number helps browsers determine whether they should use a cached copy of the stylesheet or download a fresh one.
The Problem with Static Versions
Imagine you make changes to your SCSS file and compile it into CSS.
The CSS file has changed, but the version number is still:
1.0
Many browsers will continue using the cached stylesheet because they believe nothing has changed.
As a result, you might refresh the page and not see your latest styles.
How filemtime() Solves This
The PHP function filemtime() returns the last modified timestamp of a file.
For example:
echo filemtime(
    get_template_directory() . '/assets/css/style.css'
);
Might output:
1749900600
When WordPress uses that value as the stylesheet version, the generated URL becomes:
style.css?ver=1749900600
Now let’s say you edit your SCSS file and compile it again.
Because the CSS file was updated, its modification time changes:
1749901200
WordPress now generates:
style.css?ver=1749901200
Since the URL has changed, the browser automatically downloads the latest stylesheet instead of using the cached copy.
Why This Is Useful
During development, you’ll be modifying your SCSS files frequently.
Using filemtime() means you never have to manually update version numbers whenever your CSS changes.
Simply save your SCSS file, let Sass compile it, refresh the browser, and you’ll always see the latest styles.
This small trick can save a surprising amount of time when working on WordPress themes.
What About a Live Website?
At this point, you might be wondering:
“My WordPress website is hosted on a remote server. Am I supposed to install Node.js there?”
Not at all.
Most developers work locally and deploy the finished files to the server.
A typical workflow looks like this:
Local Development
        ↓
Write SCSS
        ↓
Compile CSS
        ↓
Upload Theme Files
        ↓
Live Website
The server never needs to understand SCSS.
By the time your website receives the files, everything has already been converted into regular CSS.
For smaller projects, this might simply mean uploading files through FTP.
For larger projects, developers often use Git repositories and automated deployment workflows.
Either way, the server only needs the final CSS file.
Should I Upload My SCSS Files to the Server?
This is another common question.
Technically, yes, you can upload your SCSS files to the server.
However, in most cases, there’s no need.
Remember, browsers cannot read SCSS. Visitors only need the compiled CSS file.
For personal projects, uploading the SCSS files isn’t usually a problem.
For client projects and production websites, many developers prefer to keep only the compiled CSS on the server and keep the SCSS source files in their local development environment or Git repository.
This approach has a few advantages:
- Cleaner production environment
- Fewer unnecessary files on the server
- Easier maintenance
- Better separation between source code and compiled assets
A common setup is:
Local Computer
├── scss/
├── css/
└── source files

Server
└── css/
The SCSS files remain part of the development workflow, while the server only receives what is needed to run the website.
Why I Still Use SCSS in 2026
Modern CSS has improved dramatically.
We now have CSS variables, native nesting, container queries, and many other features that once required preprocessors.
So why do I still use SCSS?
For me, it’s mostly about organization.
When projects become larger, having separate partial files, reusable mixins, and a structured workflow makes development much easier.
SCSS isn’t replacing CSS.
It’s helping manage CSS more effectively.
And that’s why it continues to be part of my workflow.
Final Thoughts
SCSS has been around for a long time, yet it remains one of the most useful tools available to front-end developers.
While modern CSS continues to evolve, SCSS still provides an excellent way to organize and maintain styles in larger projects.
If you’re already comfortable with CSS and looking to improve your WordPress development workflow, SCSS is a great next step.
The learning curve is small, the setup is straightforward, and once your projects start growing, you’ll quickly appreciate the benefits of a more structured styling workflow.